If you’re thinking about growing a new lawn, you’ve probably heard the word hydroseeding and wondered what it actually means. I’ve been there too, and trust me, it’s not as complicated as it sounds.
In this blog, I’ll walk you through what hydroseeding is, how the whole process works, and why so many homeowners are choosing it over sod or regular hand seeding.
You’ll learn about the step-by-step method, the cost, the different seed and mulch options, and how it compares to other lawn-growing methods.
I’ll also share the best times to hydroseed, the common mistakes people make, and the aftercare your new lawn will need. By the end, you’ll know exactly whether hydroseeding is right for you.
What is Hydroseeding?
Hydroseeding is a fast, efficient way to start a lawn using a sprayed-on mixture of grass seed, mulch, water, and fertilizer.
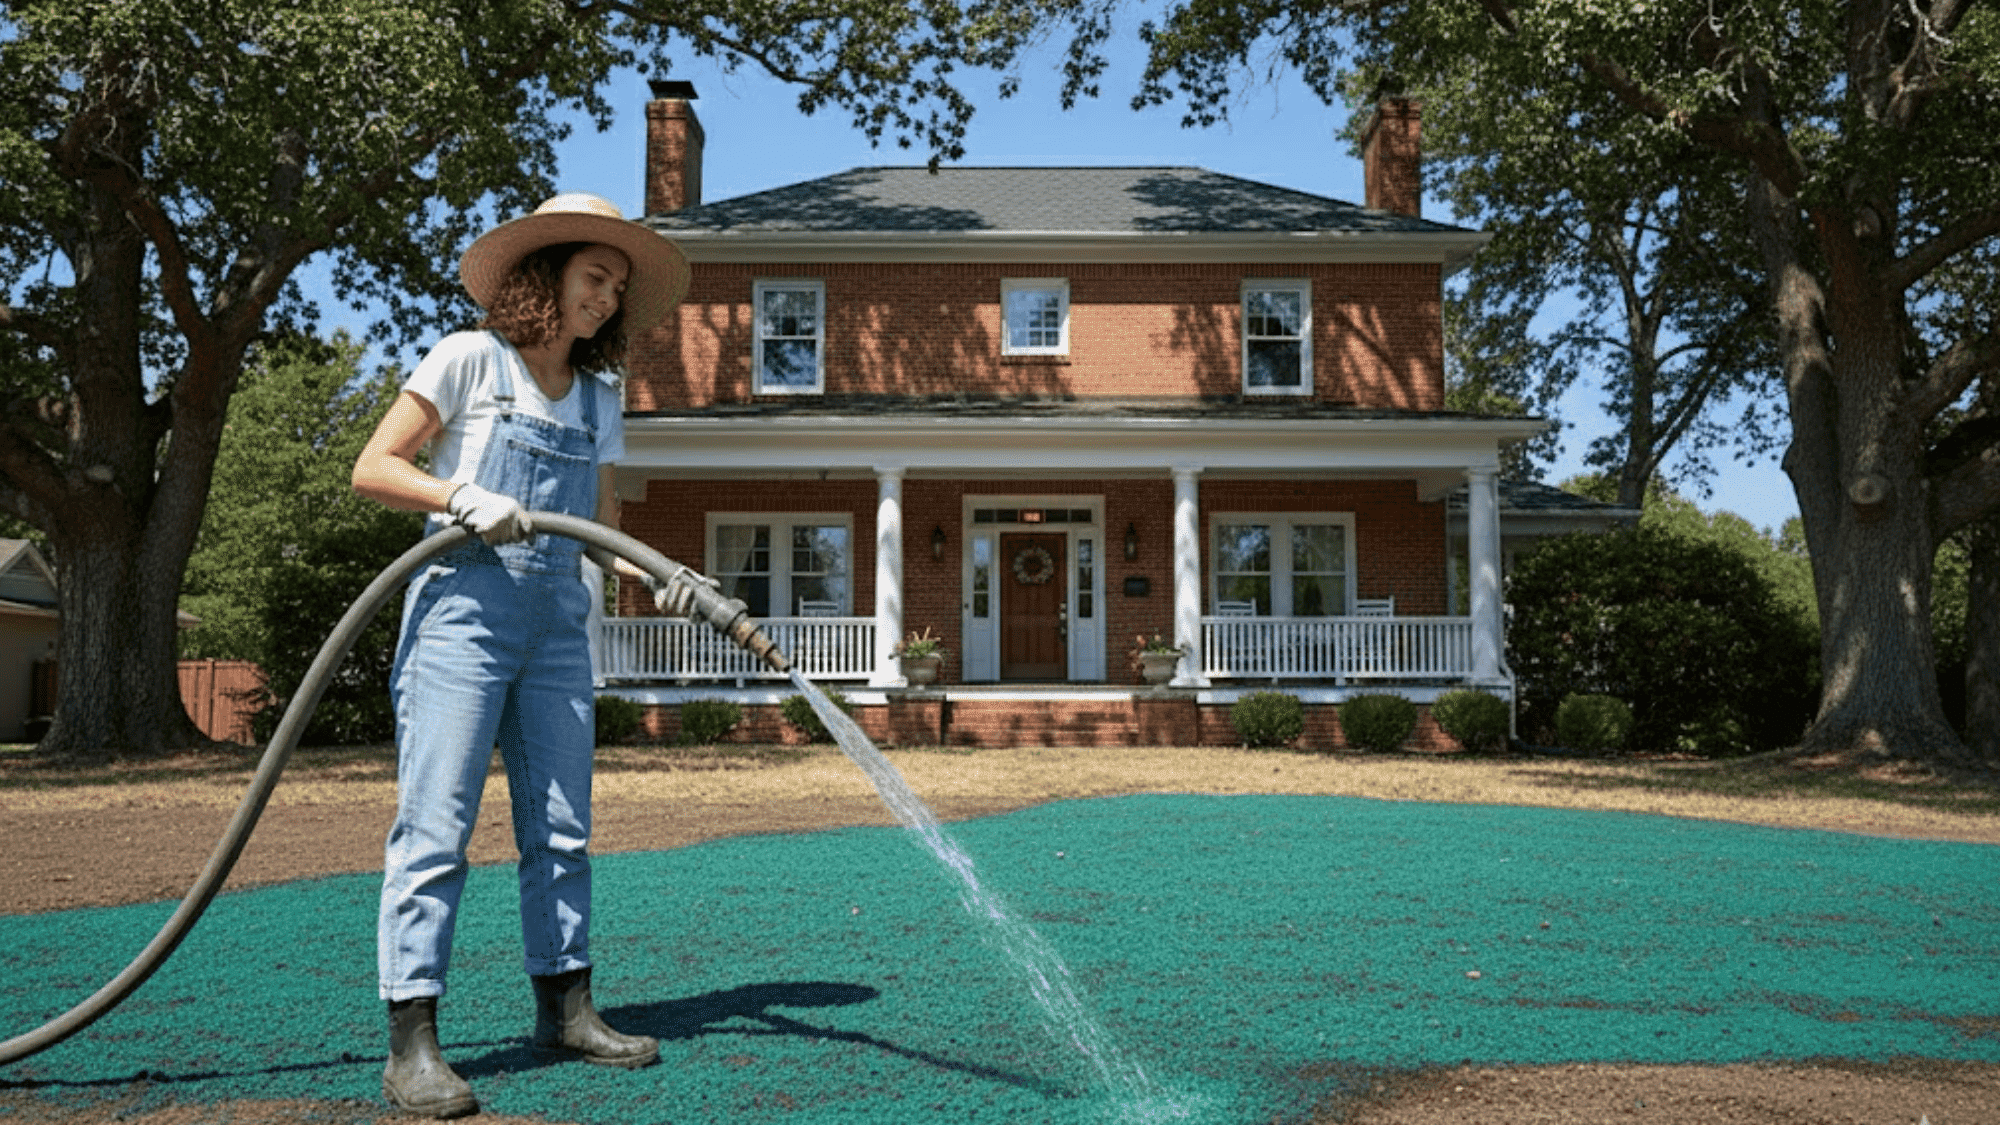
The slurry is loaded into a hydroseeder and applied evenly across the soil, creating the ideal environment for seeds to germinate. It looks like your yard is being painted green, but really, it’s getting a strong, healthy head start.
How Hydroseeding Works
- Seed + Mulch Mix – Keeps seeds moist and encourages quick sprouting.
- Fertilizer Added – Gives young grass the nutrients it needs from day one.
- Tackifiers – Sticky agents that help the mix stay in place, even on slopes.
- Even Application – Provides consistent coverage across the entire lawn.
- Faster Growth – Germinates quicker than traditional seeding at a lower cost than sod.
Hydroseeding is popular for new builds and renovating older lawns because it delivers fast results without the high price tag of sod.
With the right mixture and proper aftercare, you get a lush, even lawn that establishes strong roots and grows beautifully.
How Hydroseeding is Actually Done?
Step 1: Soil Preparation
Before any spraying happens, the soil needs some love. This means clearing away debris, removing weeds, and making sure the ground is relatively level. Sometimes you’ll need to add topsoil or do some regrading if your yard is really uneven.
Step 2: Soil Testing
Good contractors will test your soil’s pH levels and check what nutrients it’s missing. This isn’t just being fancy – it actually helps them choose the right seed mix and fertilizer blend for your specific dirt.
Step 3: Choosing the Right Seeds
Not all grass is created equal. Depending on whether you live in a hot climate or a cool one, and whether your yard is sunny or shady, you’ll need different seed types. Your contractor should help you pick what works best.
Step 4: Mixing the Slurry
Here’s where the magic happens. Inside the hydroseeder tank, they blend:
- Grass seed (the star of the show)
- Water with DWC Hydroponic System(keeps everything liquid)
- Mulch (holds moisture and protects seeds)
- Fertilizer (feeds baby grass)
- Tackifiers (makes it all stick to the ground)
- Green dye (so you can see where you’ve sprayed)
Step 5: Spraying Time
The operator sprays this thick, green mixture evenly across your prepared soil. It looks wild at first – like someone spilled a giant green smoothie on your lawn – but that’s exactly what you want.
Step 6: Watering
Right after application, you’ll need to water your new lawn multiple times a day. I’m talking 3-4 times daily for the first couple of weeks. Miss this step, and your hydroseeding investment could literally dry up and blow away.
Why People are Choosing Hydroseeding (The Big Benefits)
Okay, so why should you care about hydroseeding instead of just buying some seed bags from the hardware store? Here’s what sold me:
- Way Cheaper Than Sod – Sod can cost 5-10 times as much as hydroseeding for the same area. If you’re covering a large yard, that’s serious money saved.
- Better Than Hand Seeding – Ever tried to spread seed evenly by hand? It’s nearly impossible. You end up with thick patches and bare spots. Hydroseeding covers everything uniformly.
- Perfect for Problem Areas – Got slopes? Shady spots? Hard-to-reach corners? Hydroseeding handles all of it better than traditional methods.
- Erosion Control Built In – The mulch and tackifiers mean your soil won’t wash away in the first rainstorm. This is huge if you live anywhere with hills.
- Faster Germination – The seeds stay moist and fed, so they sprout quicker. You’ll see green fuzz in about a week, versus 2-3 weeks with regular seeding.
- Helps Keep Weeds Out – When grass grows in thick and fast, weeds have a harder time taking over. It’s not perfect, but it definitely helps.
What will Hydroseeding Cost You?
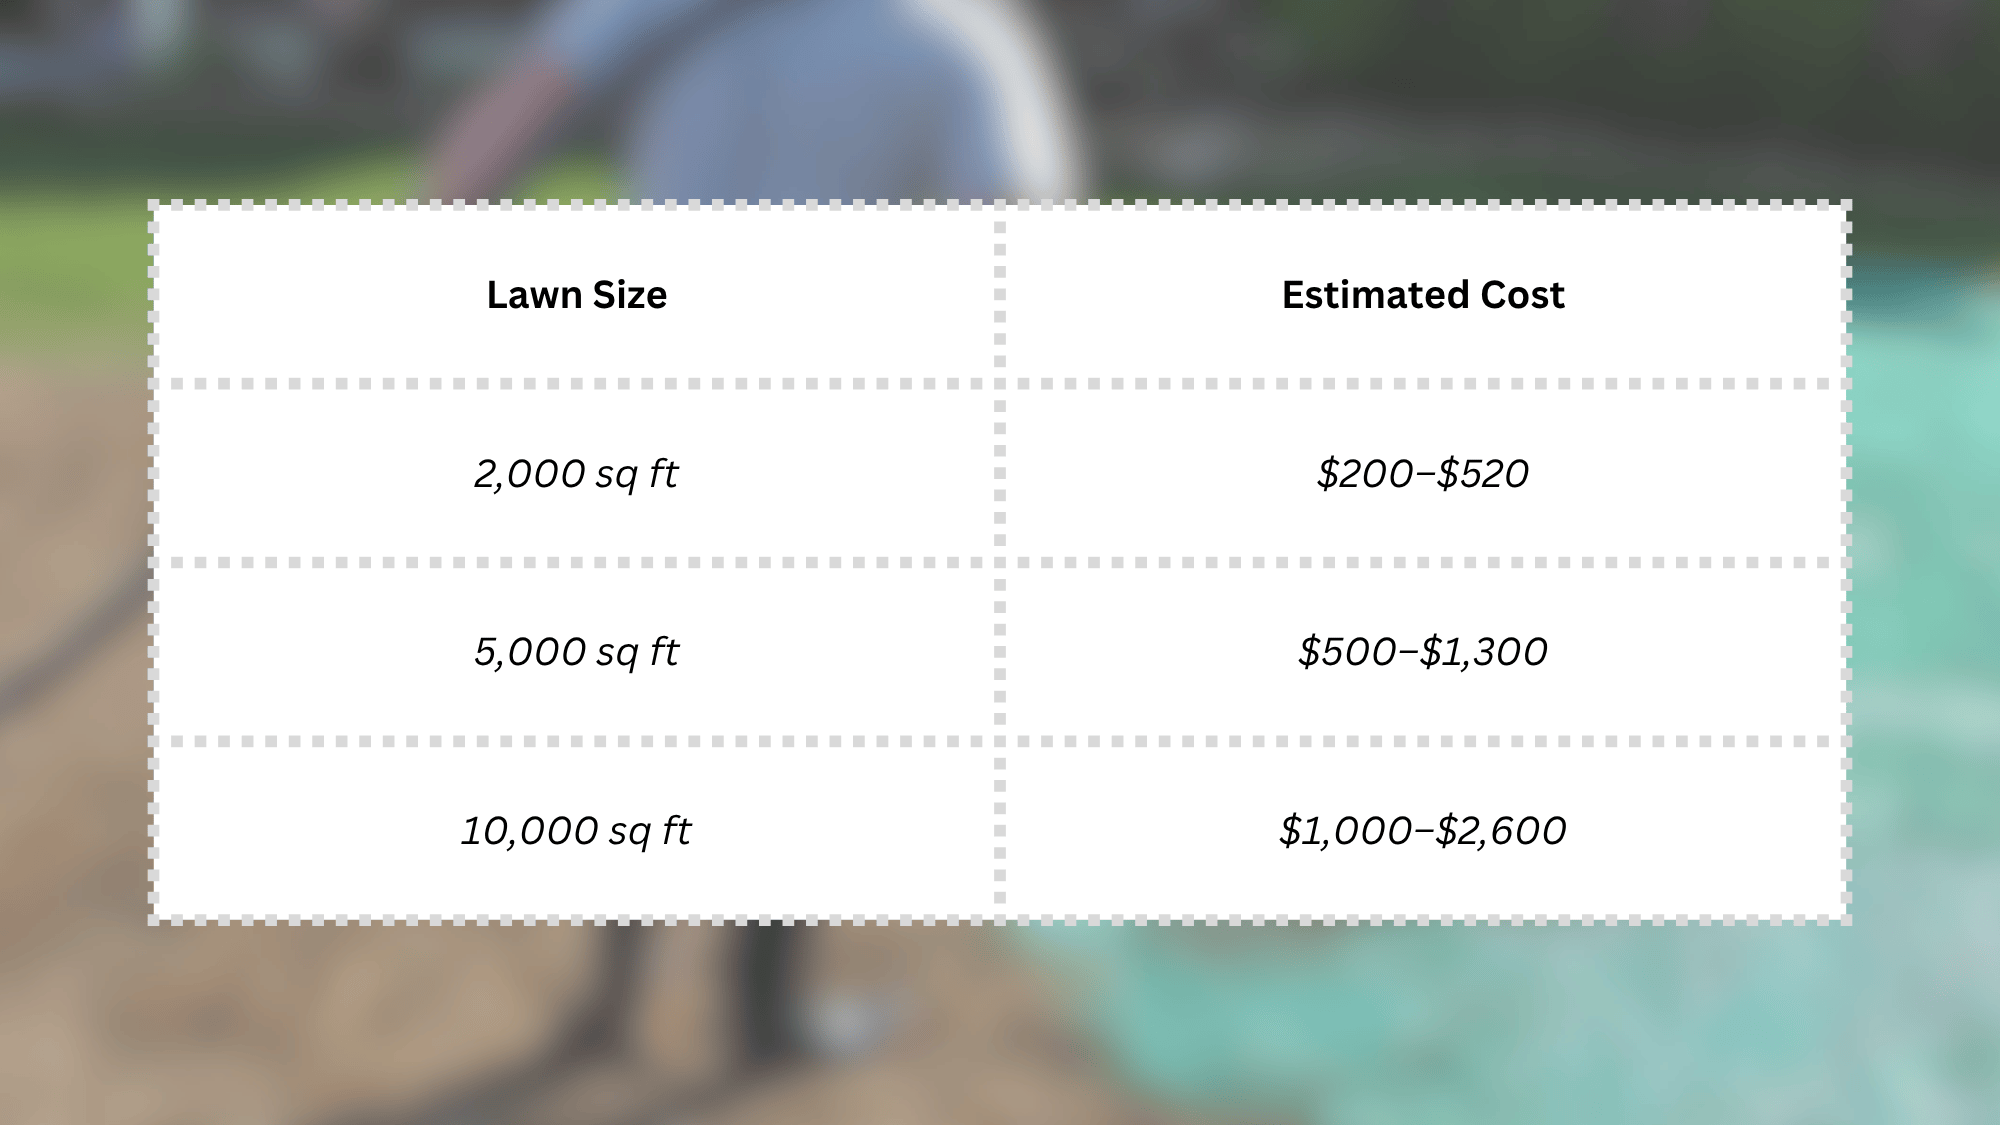
But wait, there’s more to consider. Your final price depends on:
- Lawn Size – Bigger lawns get better per-square-foot rates
- Seed Type – Premium seed mixes cost more than basic ones
- Mulch Type – Wood fiber mulch is pricier but works better than paper mulch
- Your Terrain – Steep slopes cost more because they’re harder to spray
- Prep Work Needed – If you need regrading or new topsoil, add $500-$2,000+
Other Services That Might Come Up:
- Regrading: $500-$3,000 depending on severity
- New topsoil: $10-$50 per cubic yard
- Full landscaping package: varies wildly
Understanding Hydroseeding Mixtures
Hydroseeding isn’t a one-size-fits-all solution. The mixture your contractor uses depends on your climate, soil, and the type of lawn you want.
Each slurry blend contains seeds, mulch, water, and fertilizers to help your lawn establish quickly and evenly. Knowing your options makes it easier to choose the right mix and get the results you’re hoping for.
Seed Options
- Kentucky Bluegrass – Classic, lush, but needs more upkeep.
- Perennial Rye – Fast-growing and durable.
- Fescue – Great for shade and drought-prone areas.
- Bermuda Grass – Thrives in heat; goes dormant in winter.
- Wildflowers – Ideal for natural meadows and pollinator spaces.
- Oats – Temporary cover that helps control erosion.
Mulch Types
- Wood Fiber Mulch – Top-tier moisture retention and performance.
- Blended Mulch – A mix of wood and paper, offering balanced quality and cost.
- Paper Mulch – Budget-friendly but breaks down quickly and isn’t the best choice.
Choosing the right seed and mulch combo helps your hydroseeding project succeed from day one.
Your contractor should guide you based on your location, soil conditions, and long-term goals. With the right mixture, you’ll give your new lawn the strong, healthy start it needs.
Comparing Hydroseeding With Other Options
Let’s compare apples to apples so you can make a smart choice:
Hydroseeding vs. Sod
| Factor | Hydroseeding | Sod |
|---|---|---|
| Installation Time | 1 day for most lawns | 1-2 days |
| Instant Results? | No – takes 2-3 weeks to see green | Yes – instant lawn |
| Long-term Quality | Deep roots, very durable | Can be less hardy |
| Best For | Budget-conscious, large areas | When you need instant results |
Sod is basically instant gratification – you roll it out and boom, you have a lawn. But you’re paying big time for that convenience. Hydroseeding takes more patience but gives you a stronger root system and costs way less.
Hydroseeding vs. Traditional Seeding
| Factor | Hydroseeding | Hand Seeding |
|---|---|---|
| Coverage Quality | Very even | Often patchy |
| Germination Speed | 7-14 days | 14-21 days |
| Works on Slopes? | Excellent | Poor (seeds wash away) |
| Best For | Quality results, slopes | Tiny areas, tight budgets |
Hand seeding is cheaper, sure, but you get what you pay for. If you want professional results, hydroseeding is worth the extra cost.
When Should You Hydroseed?

Timing matters more than you think. Here’s the honest truth:
Best Times:
- Spring (March-May): Moderate temps, good rainfall, seeds love it
- Fall (September-November): Cool weather, fewer weeds competing, ideal for cool-season grasses
Avoid:
- Summer: Too hot, seeds can cook or need constant watering
- Winter: Ground’s too cold, seeds won’t germinate
The sweet spot is when daytime temps are between 60-75°F and you’re getting regular rain. If you hydroseed in peak summer, be ready to babysit your lawn with constant watering.
Common Hydroseeding Mistakes (Learn From Others’ Fails)
I’ve heard enough horror stories to share these warnings:
- Skipping the Soil Test – You might be planting the wrong seeds for your soil type. Don’t guess.
- Wrong Seed Mix for Your Climate – Northern grass in a southern state? It’ll die. Pay attention to your growing zone.
- Uneven Spraying – If your contractor misses spots, you’ll have patchy results. Make sure they’re experienced.
- Hydroseeding at the Wrong Time – Doing this in July or January? You’re fighting an uphill battle.
- Not Watering Enough – This is the #1 killer of hydroseeded lawns. Set phone alarms if you have to!
- Buying Cheap DIY Kits – Those hose-end sprayers don’t compare to professional equipment. You’ll waste money on poor coverage.
Hydroseeding Aftercare (Don’t Screw This Up)
Your hydroseeded lawn is like a baby – it needs constant attention at first:
| Time Period | Watering Schedule | Lawn Care & Foot Traffic |
|---|---|---|
| Weeks 1–2 | Water 3–4 times daily for 5–10 minutes each; keep soil consistently moist, not flooded | Stay off the lawn completely |
| Weeks 3–4 | Reduce to twice daily watering | Still, avoid walking on it as much as possible |
| Weeks 5–8 | Water once daily with deeper soaks | First mowing when grass is 3–4 inches tall (use sharp blades); light foot traffic is okay |
| Month 3+ | Switch to a normal watering schedule for your climate | Regular mowing; consider first fertilization; weed control as needed |
Wrapping Up
After learning what hydroseeding is, how it works, and what it costs, you can see why so many people are choosing it to grow a strong, healthy lawn.
I like that it gives you great results without the high price of sod, and it works well even in tricky areas like slopes or large yards.
With the right seed mix, good timing, and proper watering, you can end up with a thick, green lawn that lasts for years.
Just remember, your aftercare matters as much as the spraying itself. If you want a beautiful yard without the stress, hydroseeding is a smart option.
Ready to start planning your lawn? Let me know, and I’ll help you take the next step!