I used to think buying shirts was simple, just grab your usual size and go. Then my sister watched me struggle into yet another “medium” that fit like a sack and finally sat me down for a reality check.
She explained that casual shirts with their vague S, M, L sizing work completely differently from dress shirts that need actual measurements like neck circumference and sleeve length. That conversation changed everything for me.
Now I’m putting together this shirt measurements guide because if you’re anything like I was, you’re probably guessing at sizes and ending up with shirts that bunch weird at the shoulders or have sleeves that swallow your wrists.
We’ll go through which measurements actually matter, how to take them yourself without a tailor, and what those numbers mean when you’re standing in front of your closet or scrolling through an online store.
Getting to Know Your Shirt Measurements: Where Do We Start?
My sister showed me that not all shirts play by the same rules, and honestly, that explained so much.
Dress shirts demand precision with neck size, sleeve length, and exact numbers that actually matter. Casual tees and button-downs stick with those stretchy S-M-L labels that somehow mean different things at every store.
Tailored shirts take it even further with chest and waist measurements for that custom feel. Then there’s vanity sizing, which is basically brands making their sizes bigger so we feel better about ourselves.
Sneaky, right? Reading inches versus centimeters depends on where you shop, and US sizing runs differently from UK, which is different from EU. Same shirt, three different size labels.
Once I started keeping my actual numbers handy, shopping stopped feeling like guesswork.
Essential Dress Shirt Measurements
My sister pulled out a measuring tape and walked me through each part of a shirt like we were solving a puzzle. Turns out, there are specific spots on your body that determine whether a shirt works or becomes another closet reject.
Let’s break down each measurement so you know exactly what to look for.
| Measurement | How to Measure | Good Fit Indicator |
|---|---|---|
| Neck Size | Around the base of the neck, add half an inch | Two fingers fit between the collar and the neck |
| Sleeve Length | Center back neck across the shoulder to the wrist bone | Cuff sits at the wrist bone, shows quarter-inch with jacket |
| Chest/Bust | Around the fullest part, tape level | Can pinch 2-3 inches of fabric at the side seam |
| Shoulder Width | Point to point across the back where the sleeves attach | The seam sits right at the shoulder edge, not beyond or before |
| Waist | Natural waistline, relaxed | Slim fit tapers 4-6 inches from the chest, classic has less |
| Shirt Length | Shoulder seam to bottom hem | Dress shirts cover the seat, casual shirts end at the mid-fly |
| Armhole | Around where the sleeve meets the body | High for dress shirts, lower for casual and layering |
| Cuff Size | Wrist circumference plus half an inch | Slides over hand, sits snug without cutting in |
| Yoke | Shoulder to shoulder across the upper back | Lies flat with no pulling or bunching |
| Hem Circumference | Around the shirt’s bottom opening | Tucks without pulling, drapes cleanly when untucked |
How to Measure a Shirt Correctly?
I came across this video from a custom shirt maker who walks through the entire measuring process, and it honestly cleared up so much confusion for me.
What You’ll Need
- Soft fabric measuring tape (not the stiff metal kind from your toolbox)
- A well-fitting shirt for reference
- Another person to help (measuring yourself is tricky)
- Your measurements are written down somewhere handy
Step 1: Measure Your Neck

Start at the back of your neck and wrap the tape around to meet under your Adam’s apple. Leave enough space to slide one finger between the tape and your skin.
This finger gap is crucial because you need breathing room. If you already know you prefer a specific collar size from store-bought shirts, just convert that to centimeters and use it.
Step 2: Get Your Chest and Waist

For the chest, wrap the tape around the widest part without leaving any gap. Keep it level and don’t cross the tape over itself.
For the waist, measure around your belly button with your stomach relaxed. Don’t suck in or you’ll end up with a shirt that’s too tight when you’re sitting normally.
Step 3: Measure Shoulders Properly

If you’re wearing a shirt with shoulders that fit well, measure from one shoulder seam straight across to the other.
If the shirt doesn’t fit right in the shoulders, locate your actual shoulder bones and measure from one bone across the top of your back to the other, like a coat hanger draped across your shoulders.
Step 4: Sleeve Length with Bent Arm
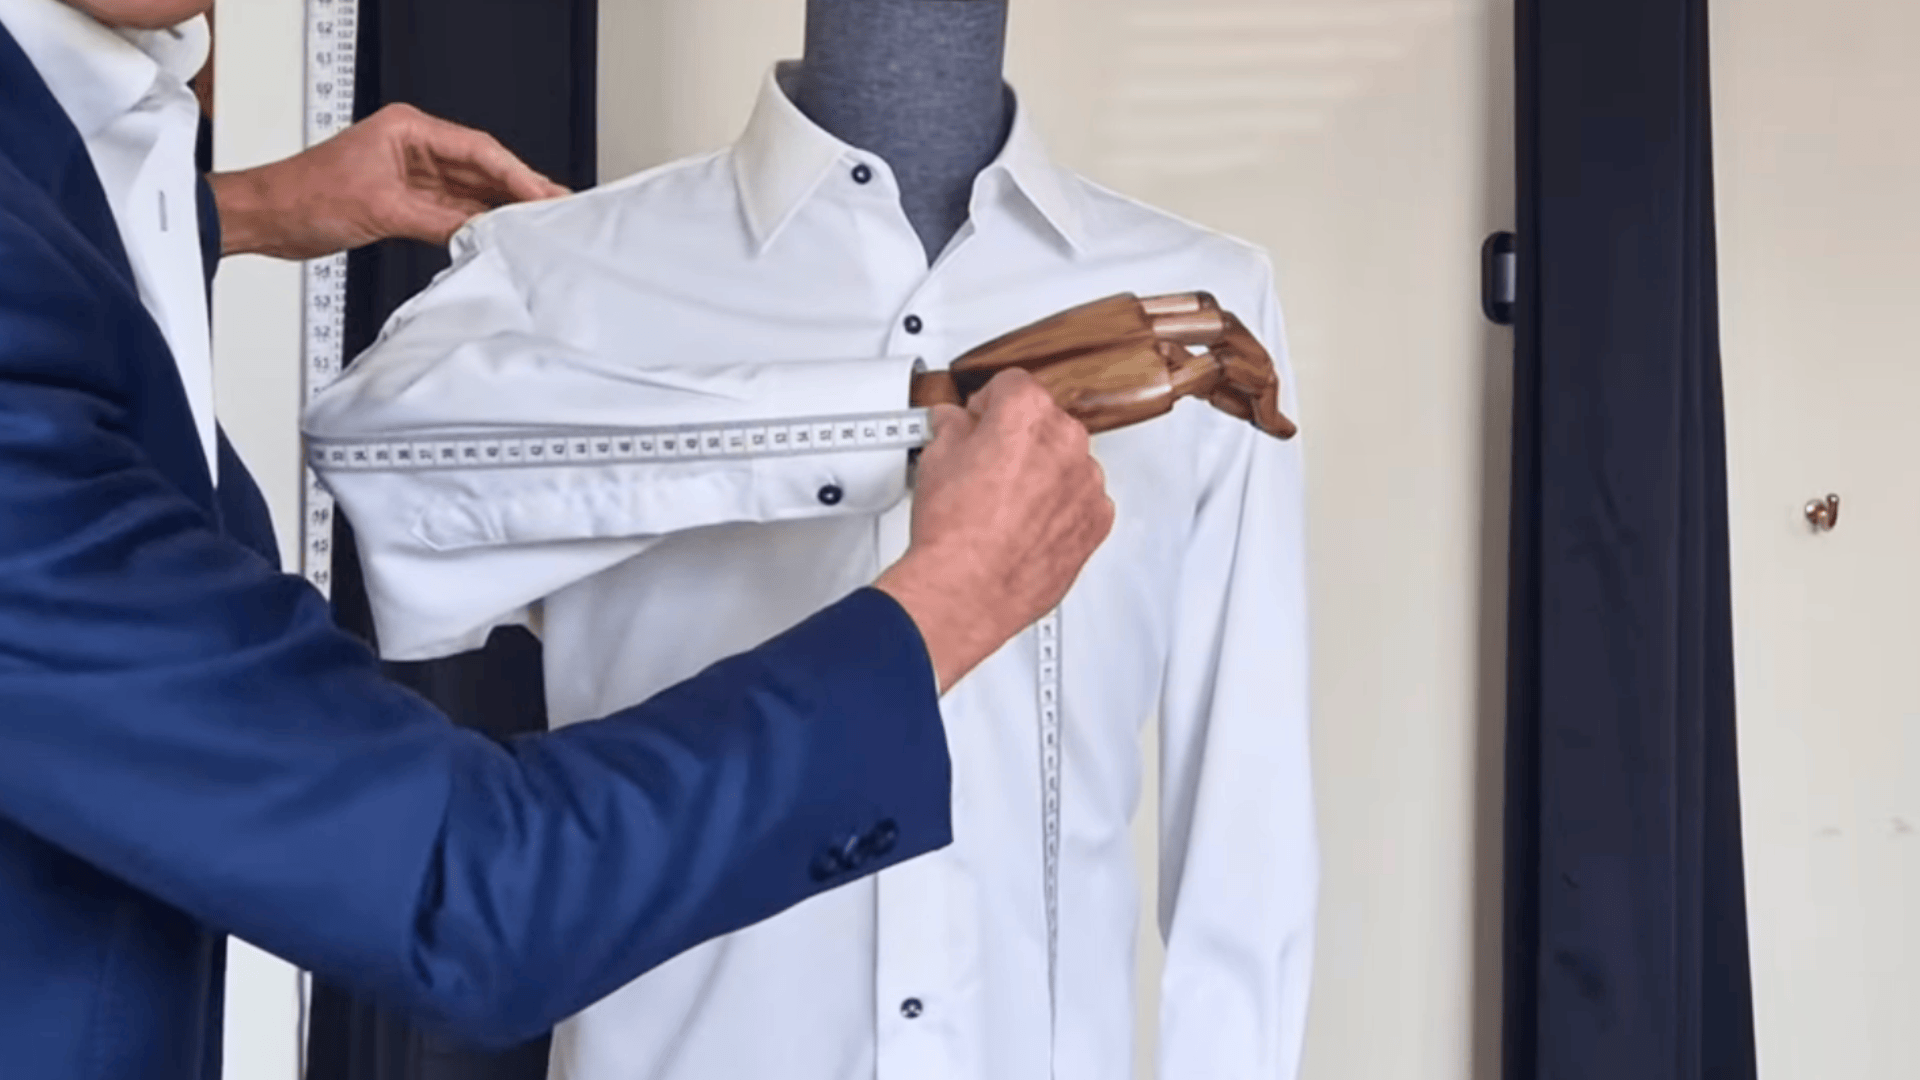
Hold your arm out in front of you with your elbow bent at a right angle. This position gives you the longest measurement your sleeve will need.
Start from your shoulder bone, go down around the outside of your elbow, and continue to your wrist bone. Measure along the outside of your arm, not underneath.
Step 5: Finishing Touches
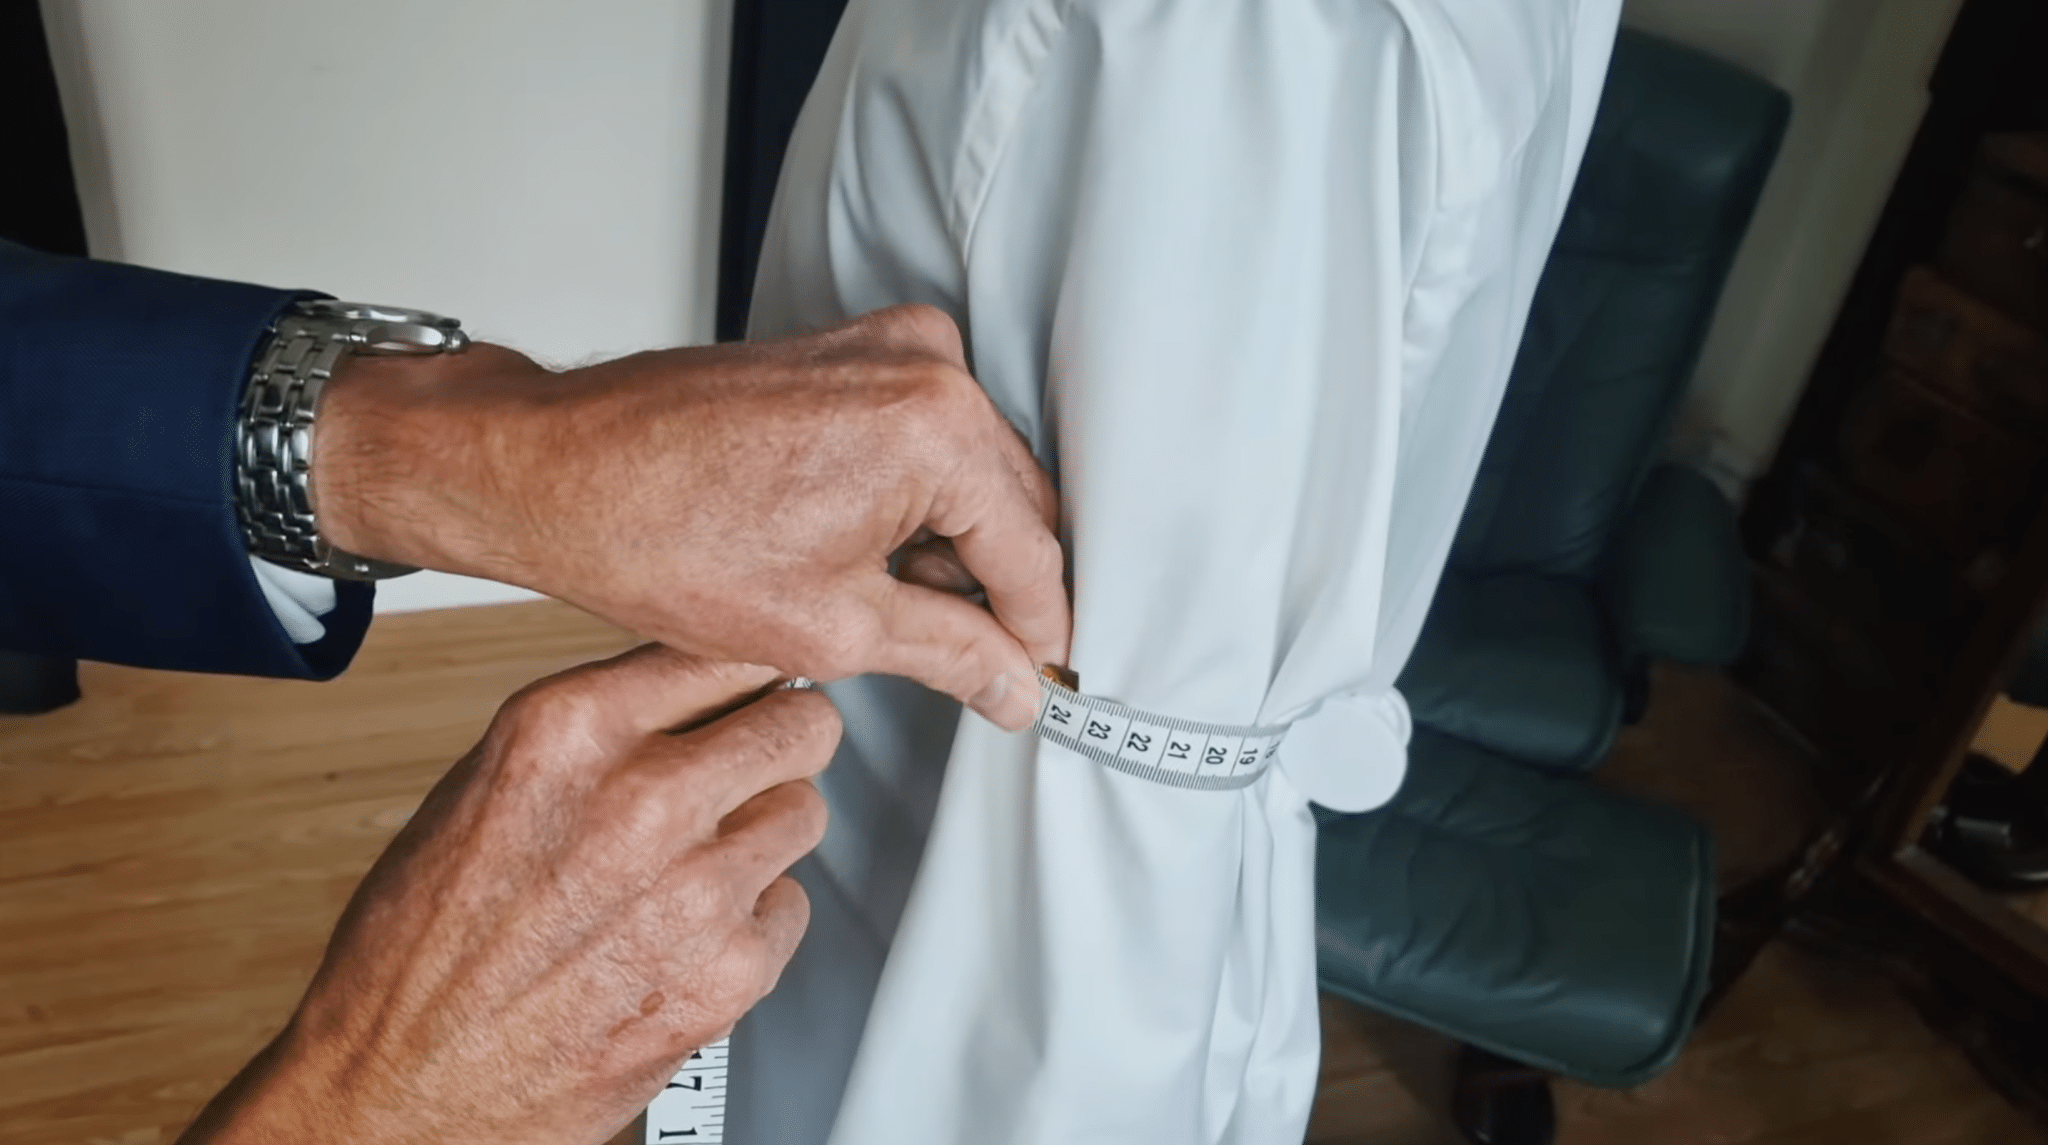
Measure your bicep around the fullest part of your upper arm, then your wrist where you’d wear a watch.
For shirt length, use an existing shirt you like as a reference, or measure from the base of your collar down to where you want the hem to fall, usually just covering your seat for dress shirts.
For more information, check out this video tutorial by Jonathan P Farley
Dress Shirt Measurement Guide: What Sets Them Apart?
Dress shirts operate on a completely different system than casual shirts, and understanding this changed how I shop for formal wear.
Instead of vague size labels, dress shirts use precise numbers that tell you exactly what size fits.
The Neck and Sleeve Formula Explained
Dress shirts use a two-number system that looks something like 15.5/34 or 16/35. The first number is your neck size in inches, and the second is your sleeve length.
This formula exists because dress shirts need to fit perfectly at the collar and cuffs, especially when you’re wearing a tie or suit jacket.
Classic fit has more room through the body, slim fit tapers at the waist, tailored fit sits between the two, and athletic fit accommodates broader shoulders and chest with a narrower waist.
How Collar and Cuff Styles Affect Your Measurements
Collar style changes how the neck measurement feels. Spread collars sit wider and work better with larger tie knots, while point collars are narrower and more traditional.
Button-down collars add casual flexibility but still need accurate neck sizing. Cuff style matters too because barrel cuffs with one or two buttons require different wrist measurements than French cuffs that fold back and use cufflinks.
The sleeve placket (that reinforced opening near the cuff) affects how adjustable the fit is, so if you’re between sizes, consider styles with more adjustment room.
How Do Shirt Measurements Affect Fit?
I used to ignore fit issues, thinking I just had an awkward body shape, but it turns out most problems trace back to specific measurements being off.
- Tight shoulders mean the shoulder width is too narrow. The seam should sit at the shoulder edge, not pull inward. Hardest fit issue to fix!
- Buttons pulling across the chest happen when the chest measurement is too small. A good fit lets you pinch 2-3 inches at the side seam.
- Excess waist fabric indicates the waist measurement is too large. Proper fit follows natural shape without bunching or ballooning.
- Sleeves riding up are caused by short sleeve length. Cuffs should stay at the wrist bone, showing a quarter inch with the jacket.
- Collar gaps or strangling mean the neck size is off. Two fingers should fit comfortably between the collar and the neck.
Once you know what a good fit looks like and which measurements control each aspect, fixing problems becomes straightforward.
Understanding Shirt Sizing Charts and Conversions

Standard sizing gets confusing because brands interpret sizes differently. A medium at one store fits like a large somewhere else, which is why having your actual measurements matters more than trusting the letter on the tag.
Match your measurements to the chart ranges, not the size you think you are. If your chest is 39 inches, you fall into medium territory even if you usually buy large.
Brand variations mean some run smaller or larger, so always check the specific brand’s chart before ordering. Custom shirt charts ask for exact measurements without size labels, which gives you the most accurate fit.
When measurements fall between sizes, go with the larger one for comfort or the smaller one for a fitted look, depending on your preference.
Getting Measured for Custom or Tailored Shirts
Custom and tailored shirts take precision to another level because they’re built specifically for your body.
Beyond the basic measurements, tailors need additional details to create a shirt that moves with you and fits like it was always meant to be yours.
- Bicep and forearm measurements ensure sleeves fit comfortably without restricting movement or looking too baggy around your arms.
- Hip width matters for shirt length and taper, especially if you want the shirt to drape properly when untucked or tuck smoothly without bunching.
- Stand in your natural posture when measuring, not with your chest puffed out or shoulders pulled back artificially, so the shirt fits how you actually carry yourself.
- Measure over the undergarments you’ll wear with the shirt to account for any extra layer thickness that affects fit.
- Take measurements at the same time of day since your body can fluctuate slightly, and consistency gives the most reliable results for a custom fit.
Custom shirts cost more upfront, but getting these details right means you end up with something that fits better than anything off the rack ever could.
Finding Your Fit: Which Shirt Style Suits Your Body
Fit style determines how a shirt drapes on your body, and picking the right one makes a huge difference in comfort and appearance.
Each style works better for certain body types and occasions, so knowing what they mean helps you shop smarter.
1. Slim Fit

Tapers close to the body from chest to waist with minimal extra fabric. Sleeves are narrower and armholes sit higher. Works best for lean or athletic builds with defined waists.
Shows your shape clearly, so it’s less forgiving if you carry weight around the midsection. Popular for dress shirts and going out when you want a sharp, tailored look.
2. Regular/Classic Fit

Straight cut from chest to hem with more room through the body and sleeves. Classic, comfortable option that works for most body types without clinging or restricting.
Best for broader builds, people who value comfort over a fitted look, or anyone wanting versatility. The safest choice when you’re unsure, and you can always tailor it down later.
3. Athletic Fit

Roomier through the shoulders and chest, but tapers at the waist like a slim fit. Made for muscular builds with broader upper bodies and narrower waists.
Solves that annoying tight-shoulder, baggy-waist problem. Gives you a modern silhouette without squeezing your chest and arms.
4. Relaxed Fit

Loosest cut with extra room everywhere. Hangs straight down with no tapering, offering maximum comfort and mobility.
Perfect for casual situations, larger builds, or anyone who wants easy movement over a tailored appearance. Great in hot weather or for layering. Just know it can look boxy if you’re on the slimmer side.
5. Modern Fit

Falls between slim and classic fit. Slightly tapered through the waist, but not as snug as a slim fit. More forgiving than slim while still looking current and polished.
Works well for average builds and anyone moving from classic to slimmer styles. Versatile enough for work and casual settings.
Avoiding Measurement Mistakes: What Throws Off Your Fit?
Even with the best intentions, measuring errors happen, and they can throw off your entire fit.
I made plenty of these mistakes before learning what actually causes shirts to fit wrong, so let me save you the trial and error.
- Measuring too tightly gives you numbers smaller than reality, resulting in shirts that feel restrictive and uncomfortable the moment you put them on.
- Not laying the shirt completely flat when measuring creates wrinkles and folds that add false inches to your numbers, making you think you need a bigger size.
- Including collar height in neck measurements instead of measuring where the collar actually sits throws off the entire neck size calculation.
- Forgetting to account for fabric shrinkage means your perfect-fitting shirt becomes too small after the first wash, especially with cotton.
- Measuring over bulky clothing adds extra inches that won’t be there when you wear the shirt properly, leading to an oversized fit.
Double-checking your measurements before ordering saves money and frustration. Take your time, use a soft fabric tape, and when possible, have someone help you.
Stitching It All Together
Looking back at all those ill-fitting shirts I used to buy, I wish someone had handed me this shirt measurements guide years ago.
Knowing your exact numbers takes the guesswork out of shopping and saves you from that pile of maybes sitting in your closet.
Start by measuring yourself properly, write those numbers down somewhere you can easily access them, and reference them every single time you shop.
Your wardrobe will thank you. Have questions about measuring or fitting issues you’re dealing with? Drop a comment below, and I’ll help you figure it out.